If you’ve spent any time running a micro crawler over rocks and roots, you’ve probably noticed that the little thing has a tendency to flip backward on steeper climbs or roll sideways when you’re trying to pick a line across a slope. It’s one of the most common frustrations for anyone getting started with 1/24 or 1/18 scale crawling — and more often than not, the answer isn’t a new motor or a fancy set of tyres. It’s weight. Specifically, where that weight sits on the crawler and how much you add.
In this guide, we’re going to walk through the whole process of adding weight to a micro crawler — from the simplest first steps right through to the more involved brass upgrades. We’ll look at what each change actually does to the way your crawler behaves, where things can go wrong if you get a bit carried away, and how to test your progress as you go. Whether you’re running an Axial SCX24 or a Traxxas TRX-4M, the principles are the same.
- Why Weight Matters on a Micro Crawler
- Where to Start: Repositioning What You Already Have
- Adding Brass Weight: Step by Step
- What Difference Does Each Bit of Weight Actually Make?
- The Risks: Adding Too Much Weight or Getting the Placement Wrong
- Testing and Tuning After Each Change
- Final Thoughts
Why Weight Matters on a Micro Crawler
At the heart of all this is something called the centre of gravity — the point where the vehicle’s entire weight is effectively concentrated. The lower and further forward that point sits, the more stable your crawler will be. A high centre of gravity means the truck is forever threatening to tip over backward on a climb or roll sideways when you’re side-hilling across a slope.
The goal most experienced crawlers work towards is a 60/40 front-to-rear weight bias — 60% of the total weight over the front axle and 40% over the rear. That front-heavy setup helps the front tyres bite into an obstacle and pull the truck up and over, rather than the rear end just sitting down while the front end claws uselessly at the air.
Worth noting, too, is the difference between unsprung weight (wheels, axles, tyres — anything not supported by the suspension) and sprung weight (the chassis, body, electronics). Adding weight low down and at the wheels is generally more effective than adding it anywhere on the body, because it keeps that centre of gravity where you want it — as near to the ground as possible.
Where to Start: Repositioning What You Already Have
Before you spend a penny on brass parts, have a proper look at your existing setup. The cheapest gains usually come from moving things around rather than adding anything new.
- Battery position: If your chassis allows it, try relocating the battery tray lower down or further toward the front. Even a small shift here can make a measurable difference to both the centre of gravity and your front-to-rear weight balance.
- Electronics placement: The receiver and any other small components can sometimes be tucked lower in the chassis. It’s fiddly, but it’s free.
- Body accessories: If you’ve added anything to the roof — a rack, a spare tyre, a scale winch — take it off for now. We’ll come back to why that matters in a moment.
Getting the basics sorted first means that when you do start adding brass, you’re building on a sensible foundation rather than trying to compensate for a badly balanced starting point.
Adding Brass Weight: Step by Step
Brass is the go-to material for weighting a scale RC vehicle and it’s not hard to see why. It’s dense (around 8.4–8.7 g/cm³), it machines well into small components, and it’s widely available in micro crawler-specific parts. Here’s the order I’d recommend working through it.
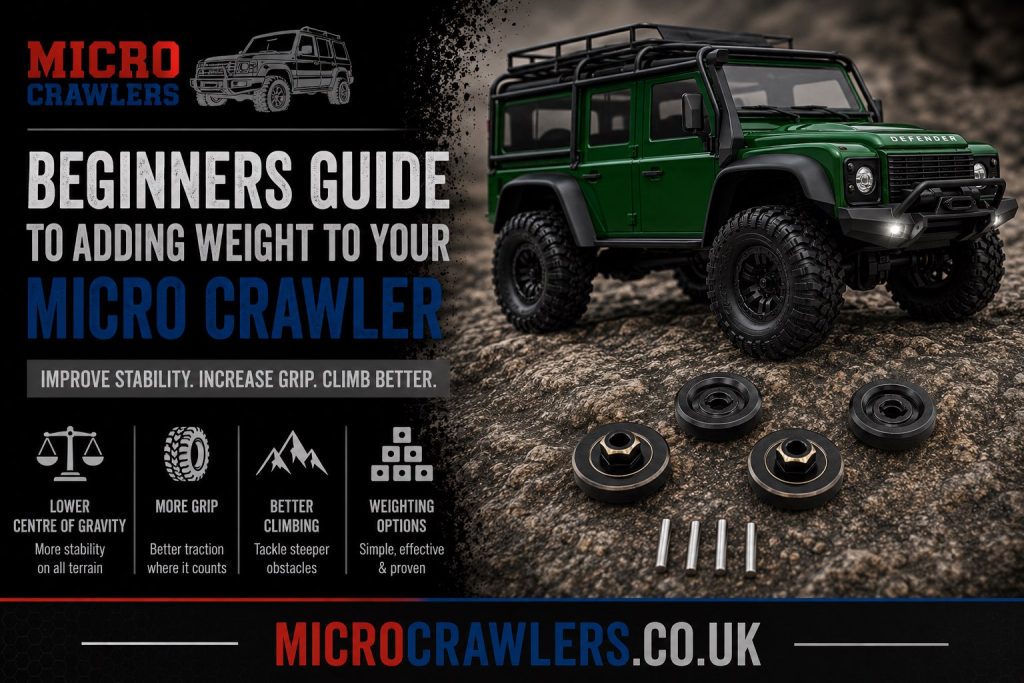
- Upgrade to brass wheel hexes. The hex is the small hub that connects the wheel to the axle. Swapping the stock plastic versions for brass ones is the simplest upgrade you can make — it adds weight at the very lowest point on the truck, and it’s reversible if you change your mind. Start here.
- Install internal wheel weights. If you’re running beadlock wheels (the type that use screws to clamp the tyre to the rim rather than glue), you can fit brass rings inside the tyre itself. Disassemble the beadlock, swap out the internal aluminium or plastic ring for a brass one, and reassemble. It’s a bit fiddly the first time, but you’ll get the hang of it. The advantage here is that the weight is genuinely at the lowest possible point — right at the rim.
- Upgrade to brass steering knuckles. These are the components at the end of the front axle that the wheel assembly pivots on when you steer. Brass versions replace the stock plastic ones and add useful weight right at the front corners of the truck — exactly where you want it for that 60/40 bias. Prioritise the front axle here.
- Fit brass differential covers. The diff covers bolt over the differential housings on both axles. Brass covers add a decent chunk of weight low down and centrally, which is about as good a place as it gets for keeping that centre of gravity sensible.
For a 1/24 scale crawler, adding somewhere in the region of 10g to 20g per wheel is considered a meaningful but manageable increase without putting excessive strain on the stock motor. Work incrementally — add one set of parts, test, then decide if you want to go further.
What Difference Does Each Bit of Weight Actually Make?
It’s a fair question, and the honest answer is that the gains build on each other. Brass hexes alone will give you a slightly more planted feel and reduce the tendency to tip on moderate slopes. Add internal wheel weights on top of that, and you’ll notice the truck tracks more confidently over uneven ground — the tyres stay in contact rather than bouncing off.
The steering knuckle and diff cover upgrades are where it really starts to come together. With the front axle properly weighted and a reasonable front bias achieved, a well-set-up micro crawler can tackle inclines that would have stopped the stock version cold. A stock crawler typically struggles above 40–45 degrees; a sensibly weighted one can often manage 50–55 degrees depending on the tyre compound and surface.
There’s also an effect on tyre performance worth mentioning. Added weight changes how the foam inserts inside the tyre behave — heavier trucks can collapse stock foams completely, which kills traction. If you’re adding significant weight, it’s worth considering stiffer foam inserts or dual-stage foams that let the tread conform to the terrain without the sidewall collapsing entirely. It’s a small detail, but it matters.
The Risks: Adding Too Much Weight or Getting the Placement Wrong
This is where things can start going the wrong way, and it’s worth being clear-eyed about it.
Adding weight to the roof is the classic beginner mistake. A roof rack loaded with scale accessories looks brilliant, but it raises the centre of gravity dramatically. The truck will roll over on angles that it should handle comfortably. If you want scale detail on top of the body, keep it as light as you possibly can.
Over-weighting the rear is equally problematic. Too much weight at the back and the front end lifts under acceleration or on climbs, which means your front tyres are doing nothing useful when you need them most.
The other risk — and this one catches people out — is what added front weight does to your steering servo. Heavier front knuckles and wheel assemblies put more load on the servo every time it tries to turn. Stock micro crawler servos are already working fairly hard; add significant brass to the front and you may find the servo stripping its gears or losing torque noticeably. The general consensus among experienced builders is that if you’re going beyond basic hex upgrades on the front axle, a high-torque metal-gear servo is worth factoring into the plan. It’s one of those things where doing it after the fact feels like going backwards — worth thinking about before you fully commit to the brass upgrades.
And finally, remember that all this extra weight is additional load on the motor and drivetrain. Don’t pile on 40g per corner and expect the stock motor to be happy about it. Incremental changes, tested as you go, will tell you when you’ve found the sweet spot.
Testing and Tuning After Each Change
The key thing here is to test properly after each modification rather than adding everything at once and trying to work out what’s doing what.
- Vertical climb test: Find a slope or ramp and gradually increase the angle until the truck tips backward. Note the angle. After each change, run the test again — you should see it improve.
- Side-hill test: Run the truck across a slope rather than up it, and note the angle at which it rolls sideways. A lower centre of gravity will push this number up.
- Steering response check: After any front axle changes, steer lock-to-lock on flat ground and listen for any signs of servo strain — clicking, hesitation, or loss of power. Catch it early.
- Tyre inspection: After a run with new weight, check how the tyres are sitting. If they’re collapsing badly, it’s a sign you need stiffer inserts before adding more weight.
Keeping rough notes as you go is genuinely useful — even just jotting down what you added and what changed. It sounds a bit over the top for a small RC truck, but when you’re trying to dial things in, it saves a lot of head-scratching.
Final Thoughts
Adding weight to a micro crawler is one of those modifications that genuinely transforms how the thing performs, and the good news is that you can make meaningful progress with simple, affordable upgrades. Start with the wheel hexes, work forward through the brass components in order, and test as you go. Keep the weight low, keep it biased toward the front, and resist the temptation to dress up the roof until you’ve got the fundamentals sorted.
The risks are real — especially around servo wear and motor load — but they’re easy to manage if you take it one step at a time rather than throwing everything at it in one go. The result of getting it right is a crawler that handles tricky terrain with a confidence that the stock setup simply can’t match.
Give it a go and let us know how you get on. If you’ve got questions about specific parts or you’re not sure where to start with your particular model, drop us a message in the comments — we’re always happy to talk through it.